Monday, 25 July 2016

Easy Sugar Cookies That Hold Their Shape (and a rolling pin giveaway)!


This is a really simple recipe for you to try and a great giveaway too.

Have you ever tried to make cookies that don’t lose their shape when baked?

This recipe ensures that whatever shape cookie you bake, they come out of the oven looking like whatever you intended them to in the first place. None of this spreading into indistinguishable blobs!


This recipe is for a plain cookie, which Americans refer to as a sugar cookie, comprises just butter, sugar, one egg, a touch of vanilla and plain flour. In the right proportions, it is the perfect dough for keeping its shape.

It doesn't contain baking powder or soda, which can make a cookie puff up. These are chilled before baking also, another important factor in keeping their shape.

Which is ideal for a Valek engraved rolling pin. These wooden pins, laser etched from Polish beech wood, are engraved with loads of designs to choose from.

I have the spiral pin which gives a lovely effect on some chilled dough as you can see.


These rolling pins are so beautiful even without using them for baking. They are also ideal for kids to use with play dough, or potters using to emboss clay.


But for us bakers they can give lovely effects on dough.


They come in an assortment of designs, take a look at their website to see just how many you can choose from. And I mean that - you can choose! I am delighted to bring you a giveaway for one Valek rolling pin with one of the designs from the website. 


The pins are available from the website for around £16 to £25.


See below for the perfect recipe for cookie dough to use with these pins and details on how to enter the giveaway!


print recipe

Sugar Cookies
Basic sugar cookies which keep their shape
Ingredients
  • 200 grams butter, softened
  • 200 grams caster sugar
  • 1 medium egg
  • 1 teaspoon vanilla extract
  • 400 grams plain flour
Instructions
Preheat the oven to 180C (160C fan) and line two baking sheets with greaseproof paper.In a mixer, beat together the butter and sugar until just combined.Add the egg and vanilla and beat until just combined.Add the flour and incorporate until a dough forms.Break the dough into two halves, wrap in clingfilm and chill for two hours.After the two hours, roll out to about a quarter of an inch thick. Finish by rolling with the Valek pin to emboss the design on your dough.Cut out with cookie cutters of your choice.Place onto the baking sheets and bake for 10 to 12 minutes until golden around the edges.Cool before enjoying!
Details
Prep time: Cook time: Total time: Yield: 24 cookies

I added a brush of melted chocolate to the bottom of mines by tracing out the cookie cutter on some greaseproof paper.

I flipped the paper over and painted some melted chocolate to the traced shape. I pressed the cooled cookie into it and let firm up.

This part is optional.

These cookies are my entry to this month’s Treat Petite hosted by Kat at The Baking Explorer. The theme is anything goes!


To be in with a chance of winning a Valek rolling pin, a design of your choice, simply enter via the Rafflecopter thingamajig below.

The giveaway ends the midnight on the 15 August. Open to UK residents only good luck!

a Rafflecopter giveaway

Disclosure Statement: I received the rolling pin free to try. I have not been paid to run this giveaway any opinions expressed are my own.

Monday, 18 July 2016

It's My Birthday and I'll Bake If I Want To (Or Jaffa Cake)

chocolate orange cake

It was my birthday at the weekend there.

As you get older birthdays aren’t quite as exciting as they were when you were younger.
When you are really young, there is the anticipation of the toys and games you thought you might be lucky to get. Being born in the summer, it was great getting loads of new stuff to play with when the schools were off.

chocolate orange cake

And as you get older, birthdays become more about going out and getting drunk with your friends.
Whilst I’m not that old, these days I like to be surrounded by family and friends and that is exactly what this birthday was.

My nephew was playing the bagpipes at an event on the day, close to our home, so we wandered over there to listen to him and have a walk about the gardens in which he was playing.


My family all trooped across to ours after and my friend Claire (whom I have known since we were 8) and her husband Iain visited us as well.

We sat and had cuppies (cups of tea or coffee as we call them) and a slice of cake.
Yes, I had made my own birthday cake. People might think it’s quite a sad thing to do, but when I have the baking gene, and it’s something I enjoy why not? It’s something I’ve always done as the picture below shows – this was taken a quarter of a century ago – hence the dodgy haircut. I think I was quite into the Charlatans!!


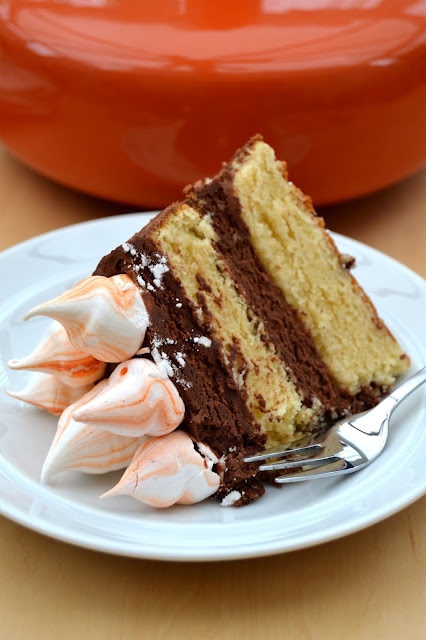
Anyhoo, this year’s cake was a chocolate orange affair. I have no idea why. I just fancied whipping up something with a choccy orange flavour – and orange happens to be my favourite color. Maybe it was something to do with that subconsciously?!

The cake was a regular yellow cake recipe with orange extract added. And the frosting was a chocolate frosting made from mandarin infused cacao powder, plus more of the orange extract.


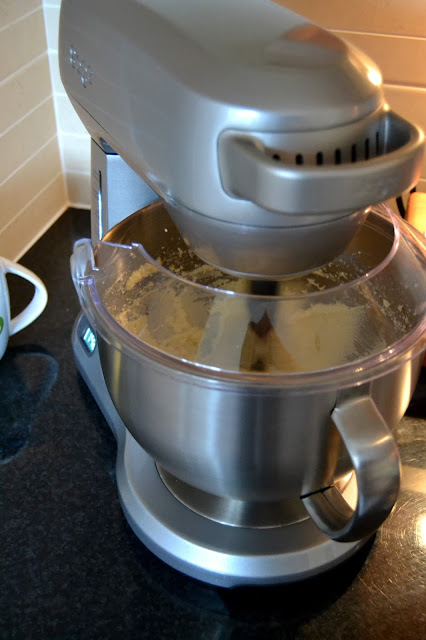
I used my new Scraper Mixer Pro from Sage which beat the ingredients together in no time at all.

chocolate orange cake


I made some mini meringue kisses to adorn the top of the cake. These are optional but if you would like to make them, the recipe for them can be found here (just use orange food colouring instead). I sparingly put the frosting around the edges like these popular ‘naked’ cakes that are around at the moment and it was as simple as that.

chocolate orange cake

Here’s how I made it…


print recipe

Jaffa Cake
Orange flavoured sponge cake with chocolate orange frosting
Ingredients
  • 170 grams unsalted butter, softened
  • 340 grams granulated sugar
  • 3 medium eggs
  • 1 teaspoon vanilla extract
  • 1 teaspoon orange extract
  • 200 grams plain flour
  • 1 1/2 teaspoon baking powder
  • Pinch of salt
  • 180 ml milk
  • 430 grams icing sugar
  • 100 grams unsweetened cocoa powder (with orange flavouring if you can get it)
  • 170 grams unsalted butter, softened
  • 125 ml milk
  • 1 teaspoon orange extract
Instructions
Preheat the oven to 180C (160F) and line and grease two 8” cake tins.Sift together the flour, baking powder and salt into a bowl and set aside.In a bowl, beat together the butter and sugar until pale and creamy.Add the eggs one at a time until they are incorporated into mix. Add the extract and mix these through also.Add one third of the flour mix to the batter and mix this through.Add one half of the milk, mixing this through.Repeat with another third of the flour, mix and finish with the last third of flour.Divide the batter between the two cake tins and pop into the oven for 25 to 30 minutes or until a toothpick comes out clean from the centre.Allow the cakes to cool fully.To make the frosting, place the butter, icing sugar, cocoa powder, orange extract and half the milk and a bowl and mix until smooth. If it’s a little too thick, add some more of the milk, a little at a time.To decorate the cake, spoon about a third of the frosting on to one half of the cake and spread with an off-set spatula.Place the second layer of cake on top and add another third of the frosting on this top, spreading with the spatula.Sparingly add the frosting to the sides if going for a roughish finish or just smear as much as you have left on.Decorate the top with mini meringue kisses if you have made them, or even orange smarties, bits of a chocolate orange, or jaffa cakes would be smashing too.Chill until ready to serve then enjoy with a cuppy.
Details
Prep time: Cook time: Total time: Yield: 1 8" two layer cake

chocolate orange cake

Thursday, 14 July 2016

10 Best Baking Essentials

Image source


Just a quick one today...

Only a few weeks until the new series of the Great British Bake Off starts. With that in mind, the Independent got in touch and asked me to share my 10 favourite baking essentials.


Have a look and see how many you have in the kitchen.

Is there anything else you think is a must for baking?

Have a read then let me know!


Monday, 11 July 2016

Scraper Mixer Pro by Sage (review)

Scraper Mixer Pro by Sage

I have a new addition in the kitchen which I am totally in love with. I was recently sent a Scraper Mixer Pro from Sage by Heston Blumenthal to try and I’ve been giving it a good workout in the kitchen for the past couple of weeks.

Scraper Mixer Pro by Sage

Disneyboi thinks I’m a bit sad for being so in awe of a kitchen appliance but anyone who uses stand-mixers will understand. They are such a useful piece of equipment in the kitchen, leaving your hands free for other tasks. I’ve had a mixer for many years, but until I received the Scraper Mixer Pro, I didn’t appreciate just how good mixers could be.

Firstly there is the look of the Scraper Mixer Pro. It has a die cast metal body and a stainless steel bowl. As you can see from the image at the top, it looks a good combination of modern but with some retro charm thrown in also. In fact my old mixer used to languish in the bottom of a kitchen cupboard and was hauled out as and when I needed it. With this one I cleared a space and it is proudly sitting on my worktop for all to admire.

Aside from looks, what is it about the Scraper Mixer Pro that I am so enamoured with?

I love the fact that the 1000 watt mixer is sturdy. It is a solid piece of kit and actually weighs 9 kilos. You feel you have a secure mixer that can handle anything you throw in it.

Scraper Mixer Pro by Sage

The mixer has an illuminated panel down the side which indicates different types of mixing such as folding, kneading, heavy beating and whipping. The lights increase depending on what speed you set the mixer at. There is also a timer function which can be set to mix something for a specific amount of time. You can pause the timer also, ideal if someone comes to the door or you need to answer the phone.

Or you can see just how long you have been mixing something for, which is a great bonus if a recipe calls for an exact time for beating such as 7 minute frosting which requires, erm, 7 minutes.

Scraper Mixer Pro by Sage

The mixer comes with four attachments and a plastic spatula. The attachments are a wire whisk, which again is sturdy. A solid metal balloon which whips up egg whites or cream perfectly.

Scraper Mixer Pro by Sage

The dough hook is also made of metal and has a large disc at the top to prevent dough from climbing up the mixer.

Scraper Mixer Pro by Sage

Bread doughs for example can be tough when it comes to kneading, but the Scraper Mixer Pro features load sensing technology and can automatically sense tougher items in the bowl and  adjusts power to ensure even speed.

There are two beating attachments, one standard flat beater and the titular scraper beater.

My old mixer was notorious for beating ingredients but not reaching the sides of the bowl. I would frequently have to turn it off, reach in with a spatula and push the food down the sides. This was especially true for sugar and butter together.

Scraper Mixer Pro by Sage

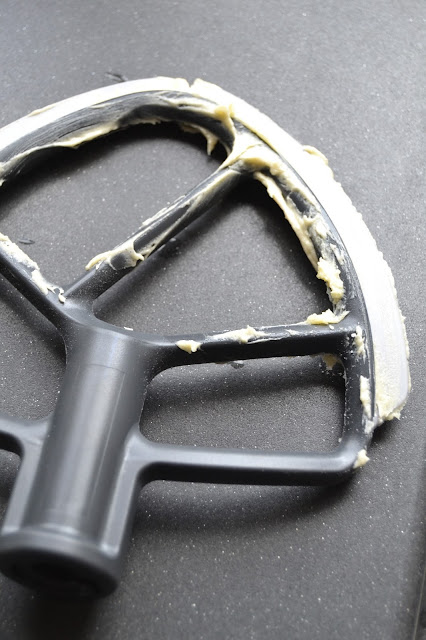
When recipes call for sugar and butter to be beaten together until light and fluffy, I can honestly say I never truly achieved that until I used the scraper beater attachment. It has rubber spatula like edges which do reach the sides of the bowl.

I love this function particularly. You pop in your ingredients and the mixer can be left alone to get on with the job, ensuring things are mixed properly. The Scraper Mixer Pro can beat up to three times faster than standard mixers, saving time and energy.

Scraper Mixer Pro by Sage

The mixing bowl itself has a 4.7 litre capacity and incorporates a handle for ease of use when lifting it off the base of the mixer. The only thing I would like to have seen, if I am being picky, would be a spout on the bowl for pouring batters. But, my last mixer didn’t have one and I have always managed without one, so as I say, I am being ultra-picky with that.

Scraper Mixer Pro by Sage

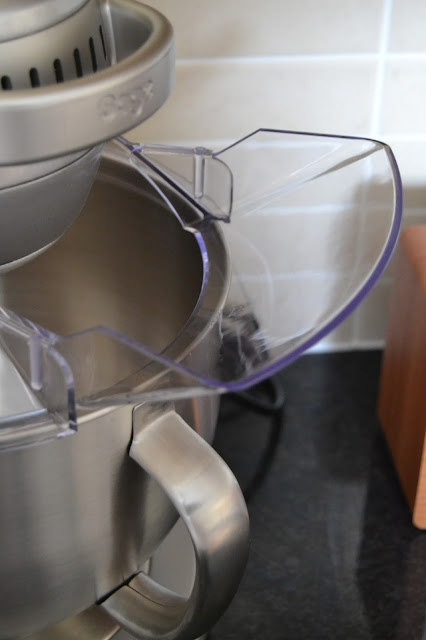
To go on top of the mixing bowl, to save ingredients flying out is the included splashguard with feeder. I like the fact the can be kept on the mixer without detracting from the look of it. The feeder part allows ingredients to be added such as flours or icing sugar without too much mess.

The mixer features quiet operation and although not entirely silent, is much, much quieter than standard mixers. No moaning from the rest of the family about the racket you are making!

Lastly, the planetary mixing function is another boon of the Scraper Mixer Pro. This mimics the way commercial bakery mixers work, with a 360 degree action, ensuring even coverage of the bowl and as a result evenly mixed ingredients.

Scraper Mixer Pro by Sage

I’ve made bread, cakes, cookies, whipped cream and meringues in the mixer so far and have failed to be disappointed.

Scraper Mixer Pro by Sage

The Scraper Mixer Pro, in my opinion having used several different makes, is one of the best on the market. It is a powerful, heavy duty machine which is like having a professional bakers mixer in your own home.

I can’t find fault and anyone who loves their baking as much as I do should seriously consider purchasing one the next time they are on the market for a mixer.


The mixer retails at £299.95 from the Sage website.

Disclosure Statement: I was sent the Scraper Mixer Pro free to review. Any opinions expressed are my own.

Monday, 4 July 2016

Cinnamon Pecan Swirl Wholemeal Bread


I love swirl bread – I’ve made a few loaves of it before in different flavours.

You make bread like you would normally, then roll the dough out and sprinkle or spread it with a filling of your choice and roll it up like a Swiss roll.


You pop it in a loaf tin, let it bake and you have a tantalising loaf of bread with swirls of flavour running right through it.


I opted this time for cinnamon and pecan swirl bread. I love the flavours of cinnamon and brown sugar, so I scattered that on my wholemeal dough. I also scattered on some chopped pecan nuts.


I was recently sent a coffee grinder from Andrew James, which I used to grind my nuts. The coffee grinder is so easy to use, just pop in your coffee beans, nuts or herbs and press down the wee button. In no time you have blitzed whatever. It was very easy to wash out too with a damp cloth.


The pecans for the recipe were blitzed to somewhere between a fine meal and chunkier bits of nut, which gave great texture to the finished loaf.


The bread when baked was very good spread with a little butter. It was even better toasted however, the flavours of the cinnamon come alive and the butter melts right into the bread making for a very decadent tasting treat.

Thanks again to Andrew James for sending me the grinder which will be used loads in the kitchen.

Here’s how I made the bread…


print recipe

Cinnamon Pecan Swirl Bread
Wholemeal bread with a swirl of brown sugar, ground cinnamon and chopped pecans built in
Ingredients
  • 500 grams wholemeal bread flour
  • 7 grams dry active yeast
  • 1 teaspoon salt
  • 300 ml warm water
  • 2 teaspoons ground cinnamon
  • 2 tablespoons light or dark brown sugar
  • 30 grams pecan nuts, chopped
  • 1 medium egg
Instructions
Make the bread by mixing the flour, yeast, salt and water together until a dough forms. Knead by hand for 7 minutes or in a mixer for 5 minutes.Place in a greased bowl and allow to prove for 1 hour. Pre heat the oven to 200C (180C fan)Remove from the bowl and roll out to an oblong about 12”x18”.Scatter the cinnamon, sugar and chopped pecans over the bread.Starting at the shortest end, roll the dough up tightly, brushing the exposed part of the dough with egg. This ensures that the dough sticks together and doesn’t come apart.Once fully rolled, fold in half again and place in a regular sized loaf tin.Bake for 35 - 40 minutes.Remove from the baking tin and allow to cool.Slice and toast if desired and serve with some butter.Enjoy.
Details
Prep time: Cook time: Total time: Yield: 1 loaf

Disclosure Statement: I was sent the coffee grinder free to review. Any opinions expressed are my own.